If your IMAP mailbox is full or is approaching the your storage limit for your account, you can simply archive messages by copying them to an offline location on your computer, sounds a bit tricky, but its quite easy and only takes a few minutes to set it up. This will free up lots of space within your mailbox without permanently deleting those old emails and can even speed up your email systems synchronisation with the email server.
The following guide will explain how to create a local archive in Outlook 2019
if you are using an earlier version look below this tutorial.
Follow the steps below to create a new local data file…
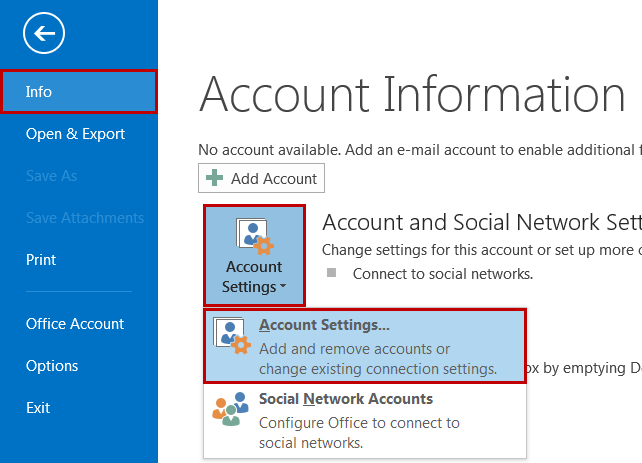
- Go to the File menu.
- Open the Account Settings menu.
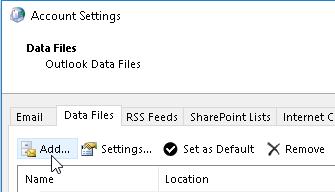
- Go to the tab within the account settings menu for Data Files.
- Select Add to create a new data file (.pst file).
- Enter a file-name for the data file and select a location if required then select Ok to create the new data file.
- Close the Account Settings.
- You should see now that a new folder location has been added in the folders pane in Outlook under your normal inbox and sent items.
- Right-click on the folder heading to add sub-folders to copy your mail items to.
You can also use the auto-archiving features in Outlook by going to the File menu and selecting Tools, then selecting Clean Up Old Items.
Select your Inbox folder that you want to archive, set a date range to archive messages for and select the new data file you created. Select Ok to automatically archive messages for the selected folder and date-range.
That’s it your all done!
How to Archive IMAP Emails in Outlook 2016 and earlier
If your IMAP mailbox is approaching the disk quota limit for your account or is full, you will need to free up some space by deleting large emails or you can archive old emails by moving them to an offline location on your computer. This will free up space without having to delete messages.
You can’t create just create an additional folder in your IMAP account as this will just get sync’d with the server and you will not gain any space.
This guide demonstrates how you can create an archive location in Outlook 2016.
It can also apply to Outlook 2007/2010/2013 also but the tabs/menus and locations may be slightly different.
Step 1
You need to create a new data file, sounds difficult but its really quite simple.
Open your Outlook Account Settings
Outlook 2003-2007 – Click the Tools Menu –> Account Settings
Outlook 2013-2016 – Click the File Menu. Next, select the Account Settings button and click Account Settings again

Step 2
Click ‘Add’ to create a new data (.pst) file.
You will be asked to choose a name for the new data file, Name it something like ‘Email Archive’.
You will now have a New Folder in your Mail Folders list with this name where you can create folders like ‘inbox’ and ‘sent items’ to store any emails you want to keep locally.

Final Step
You can now drag and drop emails you want to archive from you IMAP mailbox to your new local archive data file. You can also use the auto-archive feature of Outlook to do this on a regular basis.
it’s as simple as that
Need large mailboxes?
With enterprise features like shared mailboxes, calendars and contacts? Ask us about Microsoft Office 365 and Google’s GSuite which have mailboxes at 25gig per account. These are great solutions for storing large amounts of data online at a cost of about $5 per month per email account.

